
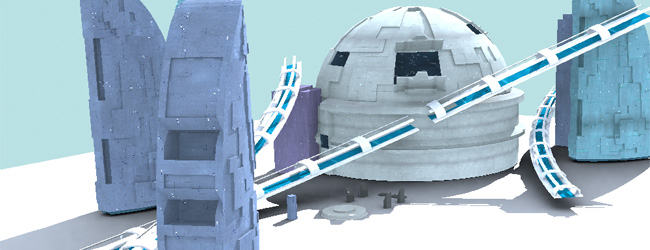
Futuristic city, 3D techniques in Flash
See the tricks behing the advanced Flash animation that was used to bring this futuristic ..

A collection of futurstic textures used in the Future city project...

An extension to the Iris Porthole effect that incorporates 3D animation, to create a reall..

Jazz up text with Gradient Overlay
Some simple Photoshop techniques for giving your text and little oooomph!..
This detailed tutorial will teach you how to use the extract filt..
Splutterfish Brazil
Brazil is a high quality renderer for 3D Studio Max. Advanced lighting techniques make renders realistic and visually stunning.
Text-Porter Texture Mapper
A great FREE plugin for 3D studio Max that automatically lays out your models mesh into an easy to edit image map.
Electric Rain Swift 3D
Create stunning 3D animations in Flash, Swift 3D allows you to render models and animation sequences ready for importing into your flash movies.
Futuristic city, 3D techniques in Flash

This project was a little experiment for an old portfolio of mine, it uses a combinations of design skills including 3D modelling, Graphics design all topped off with a bit of Flash animation. If you look closely youll see that theres a lot going on in this one, spaceships flying around and taking off, little alien men walking around, each of which has its own little design secret, and I'am here to reveal all.
The whole purpose of this project was to see what kind of website I could create if I had complete freedom without any of the usually do’s and dont’s of web site design. As strangely enough opportunities to show off your these kind of skills never really come up when designing for corporate clients he he.
This article aims to show some of the techniques and tricks used to create this project, I'am hoping it will inspire you to want to push the limits of what is possible with todays software.
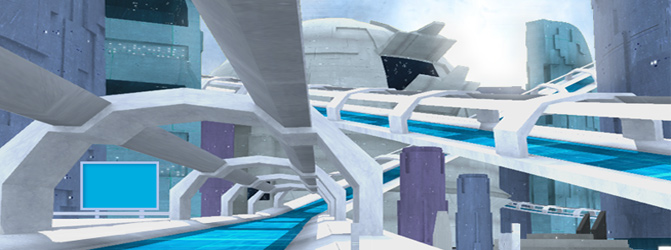
Modelling the city and setting the scene.
The first stage in the development process was to create my landscape images; these will end up as the canvas background of my flash movie. Many things inspired these landscape designs but I guess computer games like Wipeout from Psygnosis and Microsoft’s Freelancer were just some of the main influences on this project. (I guess the moral of this story kids, is to play more games!)
Each of the city images were created from a range of different elements each of which were modelled separately.
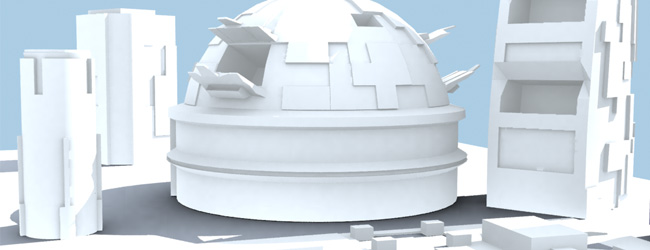
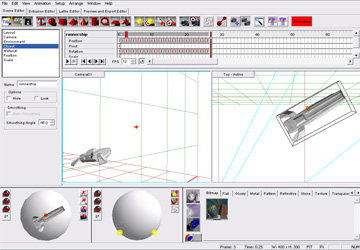
Many of the buildings were modelling using the box modeling technique, this involves starting with a segmented box shape, I have then used various modifiers to adjust and extrude areas of the box to create desired shapes (see image to the left for an example) All of the large open sections and window style panels and grooves on the above buildings were all created using this technique.
Thinking of the actual ideas for these buildings was a job in itself, I found a few would come from some pen and paper sketches, but by far the best method for generating ideas for this kind of project was to really get stuck in. By this I mean simply play with different shapes, tools and modifiers within your chosen software package, you’ll be amazed what you can sometimes come up with by accident.
Creating Textures
As you can see the buildings above don't look very impressive so the final stage of the building design was to create a series of textures. I have used Adobe Photoshop to create these textures shown below, techniques. If you look below you will see that alot of them include common effects such as Outer Glow and Levels of Opacity that bring a cool futuristic style to the final images.
The final textures were added to my individual models. Now texturing your models, there are a few different methods that you can go about texturing your finished models they are as follows:
• Shrink Wrap: The first is to simply apply your texture to the whole model, this will just cover your whole model in your chosen material or texture funny enough a bit like a shrink wrap.
• Selection Mapping: The other method is a bit more complicated invloving selecting individual areas of your model and defining them with different materials, this can be done as you edit your model but can be hard to add detail.
• Texture Mapping: This is the most common method and the most complex, it involves exporting your finished objects 3D mesh into a flat packed image file (think of it a bit like when you unfold a cardboard box) You can then load this file in advanced image editng software such as Photoshop and design a very detailed texture map.
Setting the scene
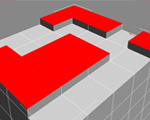
In the final rendered version of this image the camera is positioned exactly where I want it, so that everything looks perfectly in place. If you now look at the image above you will see that I have changed the angle of the camera, notice anything? Maybe the lack of err buildings? Well in reality the entire image is all just an illusion. In the end this background image was setup and positioned to look good for the camera, after all its the final rendered image that counts.
I find this a great way to work when preparing 3D for use in graphics design as it can save you loads of time. So I say sit back, think about how your final project is going to come across and for static background images such as this, there really is no need to waste time on elements that may never be seen (but of course if your were creating your scene for video this would be a very different affair).
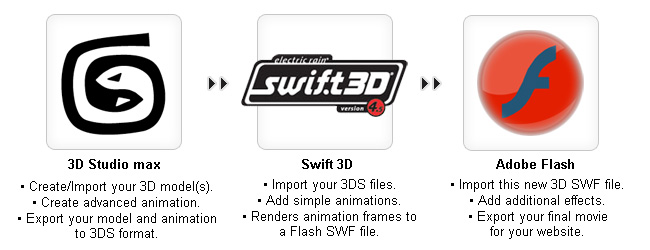
Creating the 3D animation for use with Flash
Creating 3D animation for Flash is a much unexpected mix of importing/exporting over various formats and software packages. The goal of which is to end up with a final flash movie containing your 3D animation as a sequence of pre-rendered key frames. I’m hoping the image below will help explain this processin more detail.
In a way this is a great method as it means more work for you, but it keep those all important file sizes down to a minimum. The animation for each of the space ships was created in 3D Studio Max, but before attempting any animation I decided to set up my pre-rendered background image on to a plane, this then created a visible guide by which to plan my animation path for my space ship model . (See the image below for an example of this technique)
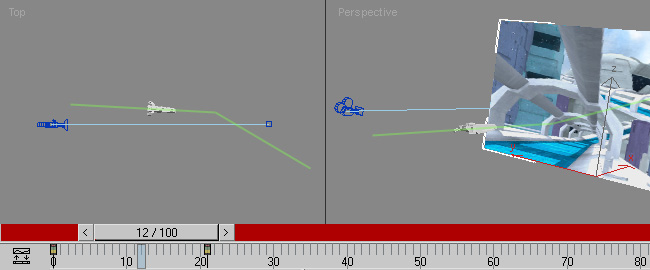
Once I had animated my space ship's path using key frames (shown above) I then exported this as a 3DS file. The great thing about 3DS files is that they do not only export the model but also any animation sequences assiciated with your models. This enables you to fire up the Swift 3D software package and not only import the model but also the animation paths and camera positions, woohoo!
Final renders with Swift 3D.
Once everything has been imported into Swift 3D its various options and settings allow you to export your animation sequence as an SWF file. As talked about previously this is the method by which it renders each frame of the animation and then creates a series of vector based key frames ready for use in Flash.
Importing the final render into Flash
After rendering my final animation in Swift 3D and saving it as a Flash SWF file, I was then able to import it into Flash. Now simply laying this new generated 3D animation on top of my landscape image still didnt give me the desired effect, so in order to give this animation a sense of depth I created a mask layer.
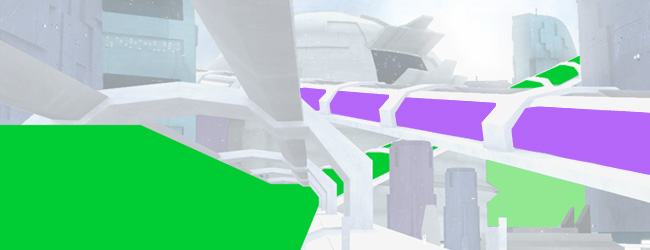
As you can see from the image above I have created a new layer above my background image. I have then drawn around various areas of the highway and buildings, The process of turning this selection into a mask would mean that the space craft animation files imported into my Flash movie would only be visible within this area therefore any part of the animation outside this area will not be seen.
This simple trick along with the predefined animation sequence creates the perfect illusion of depth, and now the craft appears to be flying in and around parts of the background image, instead of just looking out of place on the above layer.
Well there your have it, I hope you have enjoyed this little journey into the world of 3D animation for Flash. I'am hoping that this article will inspire you to come up with new exciting ideas and maybe break outside that corporate design bubble every once in awhile and push the limits of your skills.
Send to a friend


Customize colors and styling to your taste from within the CSS, then simply edit the pointer tip image. Works on any background to fit with your design.