
Create animated eyes that blink, wink and following the mouse pointer using Flash...

A collection of futurstic textures used in the Future city project...

Learn how to create this very cool 3D tunnel effect in Flash using some simple 2D animatio..

How to transform a standard photograph for use with a specific colour scheme or brand imag..

An extension to the Iris Porthole effect that incorporates 3D animation, to create a reall..

This simple tutorial is a great for those getting to grips with t..
This tutorial will teach you how to create a dynamic drop down me..
This comedy video points out some of the common yet funny mistake..

This tutorial will show you some techniques for sketching people ..

Heres a must know for anyone who designs or runs an online ecomme..
Learn how to use the gradient mapping tool to transform a standard photograph for use with a specific colour scheme or brand image.
1
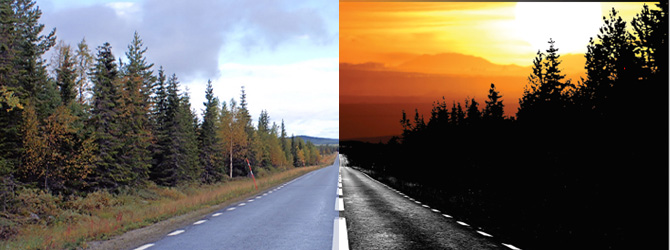
I have found the perfect long highway shot for my new design, all good except the fact that its a bit dull and lifeless. But it's ok, we're going to transform this into a vibrant work of art with the Gradient Mapping tool and a few other techniques.
3
First import your image into a new Adobe Photoshop document either set the background of the document to black or use the fill colour tool. Then be sure that your photograph is on the layer above the background layer simply pasting the image into the document should automatically do this.
3
In the next step I want to select the sky area, but first I will have to decrease the amount of detail in the cloud patterns. To do this I simply used the Image -> Adjustments -> Brightness/Contrast then increase the contrast to the point where the clouds appear less intense, I found that +60 contrast was a good amount.
4
The final step before you attempt to select the sky area is to create another layer underneath the photograph, next fill this layer with an intense colour (I have chosen red) I have chosen to do this as the area I am trying to select contains trees and therefore its pretty detailed, so this high contrast background will help me see the gaps more clearly once the area is removed.
5
Now its time to select the background/sky area for this you will need to select the “Magic Wand” tool, then adjust the settings for this tool in the top panel for a tolerance of 25 and make sure that the Anti-aliased is on and Contiguous is off
Tolerance is the amount of detail by which a selection tool will draw around an area. The Contigious setting means that the tool will select all instances of the sky white colour for the whole of the image.
6
I had decided to turn on the Contignuous setting as there was alot of detail in the tree tops of this image and i wanted to capture as much detail as possible.
Due to this setting some areas of the road whiteness where also selected so you will need to use the Polygon select tool while holding down the ALT key to deselect these areas of the image you wish to keep intact (i have marked the area that i have deselected in green above)
7
Once you are happy with your final selection hit the "Delete" key, you will notice that it has cleared the selection revealing your chosen background colour on the layer below.
Even with my attempts to get a more detailed selection i was still not happy with the end result.
8
In order to further tweak the edges of the tree tops and give them some more definition I first used the Select -> Inverse option to mirror the selection, this will change the current selection to the the image still intact e.g the trees and road.
I have then selected the brush tool with a basic brush setting.
9
I have then just carefully gone over the tree tops witht the brush, you will notice that as we have inversed the selection that the brush does not go over the egdes but helps further define them.
Once your are happpy with your touching up, press the (CTRL + D) keys to deselect the selection.
10
Now we come to the gradient mapping, this tool is perfect for removing any unwanted colours from an image. Simply select the image then use the Image -> Adjustments -> Gradient Map option. This will bring up a panel with options for selecting the colours you wish to overlay into the image, for this image i have chosen black and white and have adjusted the slider to the right increasing the amount of black.
11
For my background image I have decided to use a sunset landscape. In order to position this image i have pasted it onto a layer below the final gradient mapped image.
Once this background image is in place you can really see why its a good move to spend some time and care on a good detailed selection.
12
The final stage of the design was to add the various text and image elements for the product itself. I have chosen to add larger text such as the product name in white with detailed information and specifications in a shade of orange.
I have continued the same colour scheme throughout, fonts for titles and body text and a range of orange sunset colours. This ensures that everything relates to each other and completes a professional/branded look for the entire project.
Send to a friend
